
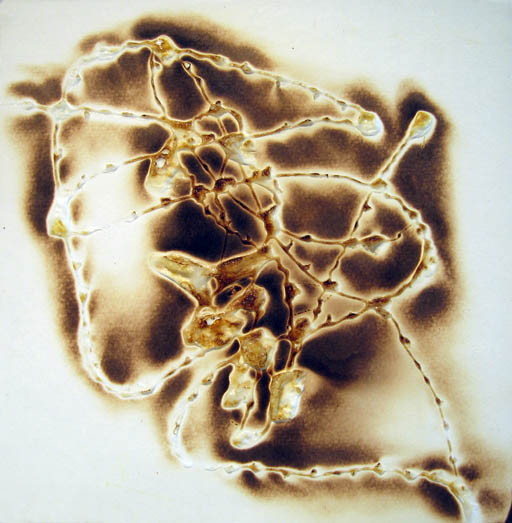
I love to experiment: As you might remember, I take an Encaustic Class at the Columbus Cultural Arts Center. In addition to tuition, we pay a lab fee which covers the use of various materials, tools, and gives each of us one 10″ square 1/2″ sheet of plywood to which a piece of good watercolor paper has been attached. Most of my supports are either Ampersand Encausticbord or encaustic gesso applied to plywood; but when I got my paper-on-board support I realized it was the perfect time to try a “glue burn.”
Doing a glue burn: unlike a shellac burn which happens toward the end of a piece, a glue burn starts at the beginning. I used Elmer’s white glue but you can use any pourable glue; wood glue is popular for its yellow color. The first step is to get the glue on your support in some interesting fashion. You can squeeze it out of the bottle it came in (or put it in a squeeze bottle), or if you have a large container you can put some in a cup or use a palette knife to fling, dribble, or spread the glue. Next, go outside; this is not an indoor activity. I have a special grid I put on our gas grill for moments like this so the back of my art work doesn’t get messy. Tie your hair back, wear eye and/or breathing protection if you, like me, worry about fumes; grab your propane torch and start burning. You can make the glue bubble, you can burn the wood or paper around the glue. Eventually you end up with something that might look like the picture at the beginning of this post.
Add wax: once you are happy with the glue burn, the piece has cooled, and any unburned glue has dried, you can start adding wax. I put down several layers of encaustic medium before I starting adding color. I had originally thought I would play up the dark areas but once I got started building up color I decided instead to focus on what you might describe as the meringue peaks, which provided the name for this piece, “String of Pearls.”

“String of Pearls”, mixed media.